
| 일 | 월 | 화 | 수 | 목 | 금 | 토 |
|---|---|---|---|---|---|---|
| 1 | 2 | 3 | 4 | 5 | 6 | 7 |
| 8 | 9 | 10 | 11 | 12 | 13 | 14 |
| 15 | 16 | 17 | 18 | 19 | 20 | 21 |
| 22 | 23 | 24 | 25 | 26 | 27 | 28 |
| 29 | 30 |
- vector
- 스위치
- STP
- Firewall
- Repository
- 자바
- 머신러닝 프로세스
- cmd
- 네트워크
- docker
- Screening Router
- abex'crackme
- 리버싱
- 크롤러
- 인공지능
- AI
- Mac
- RIP
- AWS
- Python
- 라우터
- bastion host
- vlan
- 온프레미스
- Java
- 머신러닝
- dreamhack
- 암호학
- Reversing
- CISCO
- Today
- Total
Haekt‘s log
[JAVA] 자바로 GUI (창)띄우기 본문
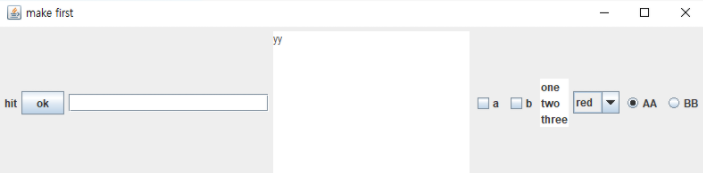
자바로 위와 같은 UI 창을 띄우는 방법을 알아보자.
- 종류 (버튼, 텍스트, 라디오 버튼 등..)
JLabel
Static 문자를 넣을때 사용하는 객체이다.
JLabel 변수 = new JLabel("hit") // static 문자를 괄호안에 입력
JButton
버튼을 만들때 사용하는 객체이다.
JButton 변수 = new JButton("ok"); // 버튼에 들어갈 이름을 괄호안에 작성
JTextArea
자유롭게 텍스트를 입력할 수 있는 영역을 만들때 사용하는 객체이다.
// 텍스트 영역에 들어갈 문자와 영역의 가로, 세로 크기를 괄호 안에저장
JTextArea 변수 = new JTextArea("yy",10,20);
JTextField
ID, PW 등 텍스트를 입력할 수 있는 영역을 만들때 사용하는 객체이다.
JTextField 변수 =new JTextField(20); // 텍스트 영역의 길이를 안에 작성
JList
리스트를 만들때 사용하는 객체이다.
String d[]= {"one","two","three"};
JList 변수=new JList(d); 	 //변수안에 리스트안에 들어갈 String 배열을 넣어줌
JCheckBox
체크박스를 만들때 사용하는 객체이다.
JCheckBox 변수1=new JCheckBox("a") // 체크박스에 적을 이름을 괄호안에 작성
JCheckBox 변수2=new JCheckBox("b")
JComboBox
콤보박스를 만들때 사용하는 객체이다.
 JComboBox 변수=new JComboBox();
 변수.addItem("red");   // 객체 생성 후, 원하는 Item을 addItem()의 괄호 안에 추가
JRadioButton
라디오 버튼을 만들때 사용하는 객체이다.
JRadioButton 변수1 = new JRadioButton("AA",true);   // 라디오 버튼에 넣을 이름을 괄호에 작성
JRadioButtton 변수2 = new JRadioButton("BB");		// true를 넣을경우 체크되어 나옴

ButtonGroup 그룹변수 = new ButtonGroup();   //라디오버튼을 묶기위해 그룹 객체를 만든다.

그룹변수.add(bb1); 그룹변수.add(bb2);  //만든 라디오를 그룹화 해준다.
- 코드 작성 순서
- import javax.swing.* and javax.awt.*
- 클래스에 JFrame 를 extends
- 클래스를 호출해줄 main 작성
- super() 를 이용해 창의 이름을 설정
- 생성자 안에 버튼, 텍스트 등의 객체를 생성
- 객체들을 띄워줄 Layout을 설정
- 창의 x표를 눌렀을때 프로세스가 종료되게 설정
- 객체들의 크기에 창 크기를 맞춤
- 창을 화면에 나타나게 함
1. import javax.swing.* and javax.awt.*
import javax.swing.*;   // 체크박스 등의 객체가 들어있음.
import java.awt.*;	// GUI 창을 만들기 위함.
2. 클래스에 JFrame 를 extends 해준다 .
import javax.swing.*;
import java.awt.*;

public class Swt extends JFrame{    // JFrame 은 창을 생성하는 클래스이다.

    Swt(){ }  //생성자

}
*JFrame 은 윈도우 프레임을 말한다.
3. 그 후 클래스를 호출해줄 main 을 작성한다.
import javax.swing.*;
import java.awt.*;

public class Swt extends JFrame{

    Swt(){ }

	public static void main(String[] args) {
  		new Swt();   //new Swt();  이후 부를일이 없으므로, 변수없이 무명 호출

     }//main
 }//class
4. super()를 이용해 창을 만들고, 상단에 띄울 이름을 정해준다.
import javax.swing.*;
import java.awt.*;

public class Swt extends JFrame{

    Swt(){

    	super("make first");  // new JFrame("make first"); 원래는 이렇게

    }

	public static void main(String[] args) {
  		new Swt();   //new Swt();  이후 부를일이 없으므로, 변수없이 무명 호출

     }//main
 }//class
* JFrame에 값을 넣으면, 상단바에 이름이 있는 창이 만들어진다.
5. 이제 Swt 생성자 안에 원하는 종류의 객체(버튼, 텍스트 등..)를 생성한다.
import javax.swing.*;
import java.awt.*;

public class Swt extends JFrame{

    //객체 변수들..
    JLabel l; JButton b; JTextArea ta;
 	JTextField tf; JCheckBox cb1,cb2; JList la;
 	JComboBox jb; JRadioButton bb1,bb2;

    Swt(){

     super("make first");  // new JFrmae("make first"); 원래는 이렇게
 	 l=new JLabel("hit");
     	 b=new JButton("ok");
 	 tf=new JTextField(20);
 	 ta=new JTextArea("yy",10,20);
	 cb1=new JCheckBox("a");
     	 cb2=new JCheckBox("b");
 	 String d[]= {"one","two","three"};
	 la=new JList(d);
	 jb=new JComboBox();
	 jb.addItem("red"); jb.addItem("pink");
	 bb1=new JRadioButton("AA",true);
	 bb2=new JRadioButton("BB");
	 ButtonGroup g=new ButtonGroup();
 	 g.add(bb1); g.add(bb2);

    }

	public static void main(String[] args) {
  		new Swt();   //new Swt();  이후 부를일이 없으므로, 변수없이 무명 호출

     }//main
 }//class
6. 이제 객체들을 창에 띄워줄 Layout 을 설정해준다.
Layout 종류
https://docs.oracle.com/javase/tutorial/uiswing/layout/visual.html
A Visual Guide to Layout Managers (The Java™ Tutorials > Creating a GUI With Swing > Laying Out Components
The Java Tutorials have been written for JDK 8. Examples and practices described in this page don't take advantage of improvements introduced in later releases and might use technology no longer available. See Java Language Changes for a summary of updated
docs.oracle.com
// setLayout() 은 Layout을 정하는 함수로, 안에 사용할 Layout 을 작성해준다.

this.setLayout(new FlowLayout());   // FlowLayout은 객체 오른쪽 정렬이다.

 this.add(l);this.add(b);this.add(tf);
 this.add(ta);this.add(cb1);this.add(cb2);
 this.add(la); this.add(la);this.add(jb);
 this.add(bb1); this.add(bb2);
7. 창의 오른쪽위의 X 를 눌러 프로세스를 종료할 수 있도록 아래 코드를 추가 해준다.
// EXIT_ON_CLOSE  == 3
this.setDefaultCloseOperation(EXIT_ON_CLOSE);
8. 객체들의 크기에 창 크기를 맞추기 위해 아래 코드를 추가해준다.
this.pack();
9. 창을 화면에 나타내기위해 아래 코드를 추가해준다.
this.setVisible(true);
전체코드
import javax.swing.*;
import java.awt.*;
public class Swt extends JFrame{

 JLabel l;
 JButton b;
 JTextArea ta;
 JTextField tf;
 JCheckBox cb1,cb2;
 JList la;
 JComboBox jb;
 JRadioButton bb1,bb2;

  Swt(){

     // 창의 이름
     super("make first");

     // 라벨이름을 hit로 설정
     l=new JLabel("hit");

     // 버튼의 이름을 ok로 설정
     b=new JButton("ok");
     tf=new JTextField(20);
     ta=new JTextArea("yy",10,20);

     // 체크박스 이름 설정.
     cb1=new JCheckBox("a"); cb2=new JCheckBox("b");

     // 리스트 설정 및 아이템 추가.
     String d[]= {"one","two","three"};
     la=new JList(d);

     // 콤보박스 설정 및 아이템추가.
     jb=new JComboBox();
     jb.addItem("red"); jb.addItem("pink");

     // 라디오버튼의 이름 설정
     bb1=new JRadioButton("AA",true);
     bb2=new JRadioButton("BB");

     //라디오버튼 그룹화
     ButtonGroup g=new ButtonGroup();
     g.add(bb1); g.add(bb2);

     // 창의 레이아웃을 FlowLayout으로 설정
     this.setLayout(new FlowLayout());

     // 창에 요소들을 추가함
     this.add(l);this.add(b);this.add(tf);
     this.add(ta);this.add(cb1);this.add(cb2);
     this.add(la); this.add(la);this.add(jb);
     this.add(bb1); this.add(bb2);

     // x를 누르면 프로그램을 종료함
     this.setDefaultCloseOperation(3);

     // 창을 요소들의 크기에 맞춤
     this.pack();

     // 창 띄움
     this.setVisible(true);
 }//Swt
  public static void main(String[] args) {
      new Swt();   //new Swt();
 }//main
}//class
결과
완성!
'언어 > JAVA' 카테고리의 다른 글
| [JAVA] DB 연결 코딩하기 (0) | 2022.11.30 |
|---|---|
| [JAVA] DB 연결을 위한 lib참조 Path 설정 (0) | 2022.11.29 |
| [JAVA] 중첩된 반복문 선택해서 break 하기 (0) | 2022.10.12 |
| [JAVA] Vector 의 사용법 (0) | 2022.10.04 |
| [JAVA] 배열 선언 방법 (1) | 2022.10.04 |


